 H3CNE实验手册

《H3CNE实验手册》由会员分享,可在线阅读,更多相关《H3CNE实验手册(87页珍藏版)》请在装配图网上搜索。
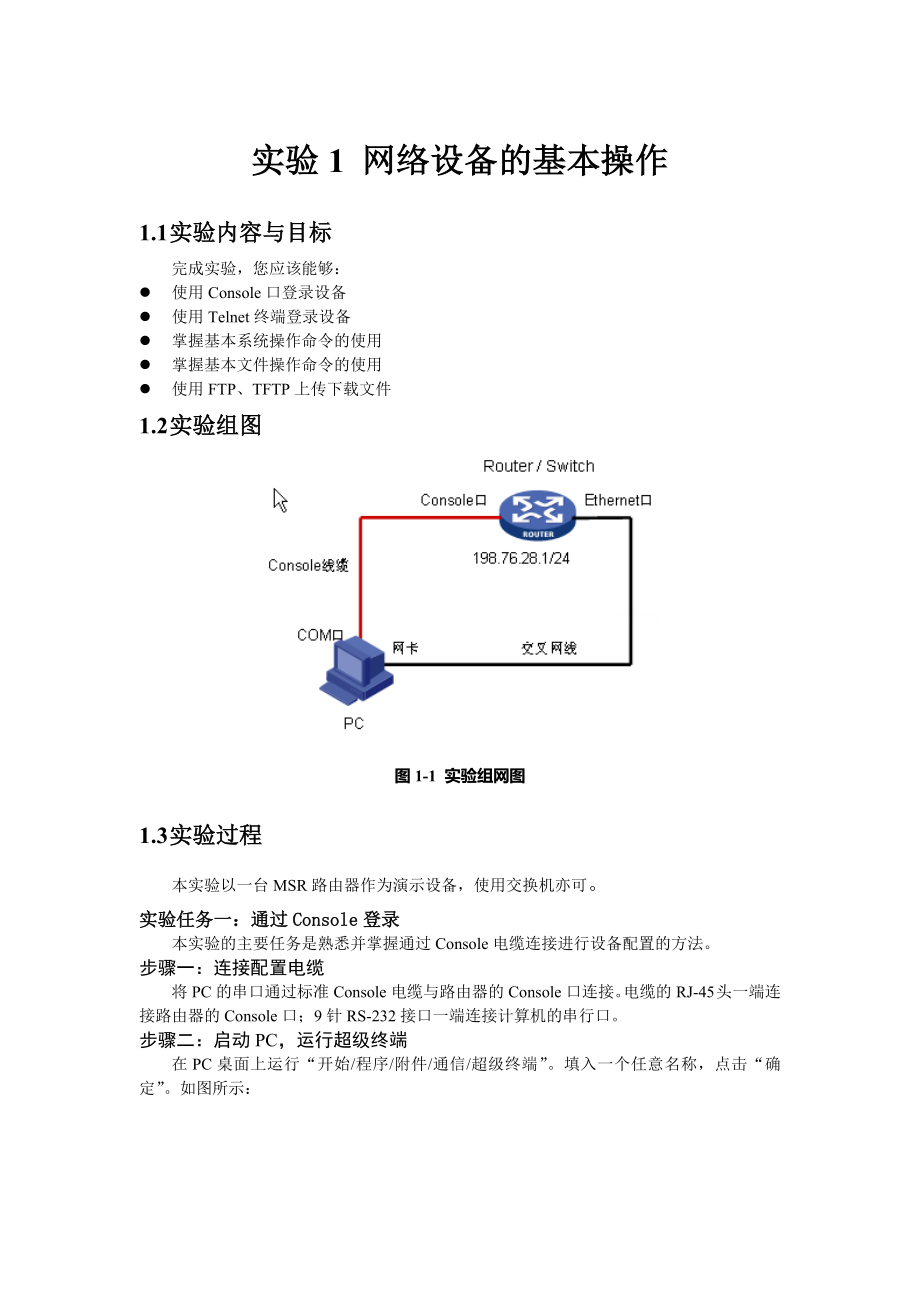
1、实验1 网络设备的基本操作1.1 实验内容与目标完成实验,您应该能够:l 使用Console口登录设备l 使用Telnet终端登录设备l 掌握基本系统操作命令的使用l 掌握基本文件操作命令的使用l 使用FTP、TFTP上传下载文件1.2 实验组图图1-1 实验组网图1.3 实验过程本实验以一台MSR路由器作为演示设备,使用交换机亦可。实验任务一:通过Console登录本实验的主要任务是熟悉并掌握通过Console电缆连接进行设备配置的方法。步骤一:连接配置电缆将PC的串口通过标准Console电缆与路由器的Console口连接。电缆的RJ-45头一端连接路由器的Console口;9针RS-23
2、2接口一端连接计算机的串行口。步骤二:启动PC,运行超级终端在PC桌面上运行“开始/程序/附件/通信/超级终端”。填入一个任意名称,点击“确定”。如图所示:从“连接时使用”下拉列表框选择合适的COM口,并点击“确定”。如图所示:这时弹出COM属性页面,点击“还原为默认值”,可以看见每秒位数为9600bps、8位数据位、1位停止位、无奇偶校验和无流量控制,点击“确定”。如图所示:步骤三:进入Console配置界面再键入回车,即可见:“H3C_”提示符。实验任务二:使用系统操作及文件操作的基本命令步骤一:进入系统视图完成实验任务一时,配置界面处于用户视图下,此时执行system-view命令进入系
3、统视图。system-view System View: return to User View with Ctrl+Z.H3C此时提示符变为*形式,说明用户已经处于系统视图。在系统视图下,执行quit命令可以从系统视图切换到用户视图。H3Cquit步骤二:学习使用帮助特性和补全键H3C Comware平台支持对命令行的输入帮助和智能补全功能。输入帮助特性:在输入命令时,如果忘记某一个命令的名称,可以在配置视图下仅输入该命令的前几个字符,然后键入,系统则会自动列车以刚才输入的前几个字符开头的所有命令。当输入完一个命令时,也可以用来查看紧随该命令的下一个命令参数。H3CsysH3Csysname
4、H3Csysname ? TEXT Host name (1 to 30 characters)智能补全功能:在输入命令时,不需要输入一条命令的全部字符,仅输入前几个字符,再键入Tab键,系统会自动补全该命令。如果有多个命令都具有相同的前缀字符的时候,连续键入Tab,系统会在这几个命令之间切换。步骤三:更改系统名称使用sysname命令更改系统名称。H3Csysname AHPTCAHPTC步骤四:显示系统运行配置使用display current-configuration命令显示系统当前运行的配置,由于使用的设备及模块不同,操作时显示的具体内容也会有所不同。在如下配置信息中,请注意查看刚刚
5、配置的sysname AHPTC命令,同时请查阅接口信息,并与设备的实际接口和模块进行比对。display current-configuration # version 5.20, Release 1509P01, Basic# sysname AHPTC# domain default enable system#vlan 1#domain system access-limit disable state active idle-cut disable self-service-url disable#interface Aux0 async mode flow link-protoco
6、l ppp#interface Serial5/0-More-用空格键可以继续翻页显示,回车键进行翻行显示,或使用Ctrl+C结束显示。步骤五:保存配置使用save命令保存配置。save The current configuration will be written to the device. Are you sure? Y/N:y选择Y,确定将当前运行配置写进设备存储介质中。Please input the file name(*.cfg)cf:/startup.cfg(To leave the existing filename unchanged, press the enter
7、key):config.cfg系统提示请输入保存配置文件的文件名,注意文件名的格式为*.cfg。该实验中系统默认将配置文件保存在CF卡中,保存后文件名为config.cfg,如果不更改系统默认保存的文件名,请按回车键。Validating file. Please wait.Now saving current configuration to the device.Saving configuration cf:/config.cfg. Please wait.Configuration is saved to cf successfully.这是第一次保存配置文件的过程。如果以后再次以co
8、nfig.cfg保存配置文件,则显示如下:saveThe current configuration will be written to the device. Are you sure? Y/N:yPlease input the file name(*.cfg)cf:/config.cfg(To leave the existing filename unchanged, press the enter key):config.cfgcf:/config.cfg exists, overwrite? Y/N:yValidating file. Please wait.Now saving
9、 current configuration to the device.Saving configuration cf:/config.cfg. Please wait.Configuration is saved to cf successfully.显示保存的配置:display saved-configuration # version 5.20, Release 1509P01, Basic# sysname AHPTC# domain default enable system #vlan 1#domain system access-limit disable state act
10、ive idle-cut disable self-service-url disable #interface Aux0 async mode flow link-protocol ppp#interface Serial5/0 link-protocol ppp#interface Serial5/1 link-protocol ppp#interface Serial5/2 link-protocol ppp#interface Serial5/3 link-protocol ppp#interface NULL0#interface GigabitEthernet0/0 port li
11、nk-mode route#interface GigabitEthernet0/1 port link-mode route#user-interface con 0user-interface aux 0user-interface vty 0 4#Return由于执行了save命令,保存配置与运行配置一致。步骤六:删除和清空配置当需要删除某条命令时,可以使用undo命令进行逐条删除。例如删除sysname命令后,系统名称恢复成H3C。AHPTCundo sysname H3C当需要恢复到出厂默认配置时,首先在用户视图下执行reset saved-configuration命令用于清空保存
12、配置(只是清除保存配置,当前配置还是存在的),再执行reboot重启设备后,配置恢复到出厂默认配置。AHPTCquit reset saved-configuration The saved configuration file will be erased. Are you sure? Y/N:yConfiguration file in cf is being cleared. Please wait . Configuration file in cf is cleared.reboot Start to check configuration with next startup con
13、figuration file, please wait.DONE! This command will reboot the device. Current configuration may be lost in next startup if you continue. Continue? Y/N:Y步骤七:显示文件目录使用dir命令显示CF卡上所有文件列表。dirDirectory of cf:/ 0 drw- - Mar 26 2008 16:07:02 logfile 1 -rw- 13288300 Dec 03 2007 10:58:36 main.bin252168 KB to
14、tal (238628 KB free)File system type of cf: FAT32步骤八:文件删除用save命令保存一个配置文件并命名为20090901.cfg,再使用delete删除该配置文件。save 20090901.cfgThe current configuration will be saved to cf:/20090901.cfg. Continue? Y/N:yNow saving current configuration to the device.Saving configuration cf:/20090901.cfg. Please wait.Con
15、figuration is saved to cf successfully.dirDirectory of cf:/ 0 drw- - Mar 26 2008 16:07:02 logfile 1 -rw- 13288300 Dec 03 2007 10:58:36 main.bin 2 -rw- 661 Sep 03 2009 09:43:42 20090901.cfg252168 KB total (238626 KB free)File system type of cf: FAT32delete 20090901.cfgDelete cf:/20090901.cfg?Y/N:y%De
16、lete file cf:/20090901.cfg.Done删除20090901.cfg配置文件后,再次查看文件列表,确认该文件已经删除。dir /allDirectory of cf:/ 0 drw- - Mar 26 2008 16:07:02 logfile 1 -rw- 13288300 Dec 03 2007 10:58:36 main.bin 2 -rwh 440 Sep 03 2009 09:43:40 private-data.txt 3 -rw- 661 Sep 03 2009 09:43:42 20090901.cfg252168 KB total (238624 KB
17、free)File system type of cf: FAT32此时,虽然选择了Y删除该文件,但是在删除该文件前后,为什么CF卡的可用内存空间却一直没有改变?那是因为使用delete命令删除文件时,被删除的文件被保存在回收站中。如果要彻底删除回收站中的某个废弃文件,必须在文件的原归属目录下执行reset recycle-bin命令,才可以将回收站中的废弃文件彻底删除,以回收存储空间。reset recycle-bin Clear cf:/20090901.cfg ?Y/N:y%Cleared file cf:/20090901.cfg.dir /allDirectory of cf:/ 0
18、 drw- - Mar 26 2008 16:07:02 logfile 1 -rw- 13288300 Dec 03 2007 10:58:36 main.bin 2 -rwh 440 Sep 03 2009 09:43:40 private-data.txt252168 KB total (238626 KB free)File system type of cf: FAT32还有另一种办法可以直接删除文件,而不需要经过清空回收站。使用命令删除某个文件,则该文件将被彻底删除,不能恢复。delete /unreserved 20090901.cfgThe contents cannot be
19、 restored! Delete cf:/20090901.cfg?Y/N:y%Delete file cf:/20090901.cfg.Done.dir /allDirectory of cf:/ 0 drw- - Mar 26 2008 16:07:02 logfile 1 -rw- 13288300 Dec 03 2007 10:58:36 main.bin 2 -rwh 440 Sep 03 2009 09:46:40 private-data.txt252168 KB total (238626 KB free)File system type of cf: FAT32实验任务三:
20、通过Telnet登录步骤一:通过console口配置Telnet用户sysSystem View: return to User View with Ctrl+Z.AHPTC创建一个用户,用户名为test。AHPTClocal-user testNew local user added.AHPTC-luser-test为该用户创建登入时的认证密码,密码为test。这里可以password命令指定密码显示方式。密码有两种显示方式,simple指定以明文方式显示密码,cipher则指定以密文方式显示密码。AHPTC-luser-testpassword simple test设置该用户使用teln
21、et服务类型,该用户的优先级level为0(0为访问级、1为监控级、2为系统级、3为管理级,数值越小,用户的优先级越低)。AHPTC-luser-testservice-type telnetAHPTC-luser-testlevel 0AHPTC-luser-testquitAHPTC步骤二:配置super口令Super命令用来将用户从当前级别切换到指定级别。设置用户切换到level 3的密码为H3C,密码明文显示。AHPTCsuper password level 3 simple H3C步骤三:配置对telnet用户使用缺省的本地认证进入VTY 04用户界面,系统支持5个VTY用户同时访
22、问。VTY口属于逻辑终端线,用于设备进行telnet或SSH访问。AHPTCuser-interface vty 0 4路由器可以采用本地或第三方服务器来对用户进行认证,这里使用本地认证授权方式(认证模式为scheme)。AHPTC-ui-vty0-4authentication-mode scheme步骤四:进入接口视图,配置以太口和pc网卡地址使用interface命令进入以太接口视图,使用ip address配置路由器以太口地址。AHPTCinterface GigabitEthernet 0/1AHPTC-GigabitEthernet0/1ip add 192.168.0.1 255
23、.255.255.0AHPTC-GigabitEthernet0/1同时为pc配置一个与路由器接口相同网段的IP地址。配置完成后,在超级终端上能看到路由器接口GigabitEthernet 0/1自动UP的信息。步骤五:打开telnet服务AHPTCtelnet server enable % Start Telnet server步骤六:使用telnet登录使用交叉网线连接pc和路由器的以太口GigabitEthernet 0/1,在pc命令窗口中,telnet路由器的以太口IP地址,并回车。输入telnet用户名及口令,进入配置界面,使用?查看此时该用户权限下可使用的命令。由于此时登录用户
24、级别处于访问级,所以只能看到并使用有限的几个命令。 步骤七:更改登录用户级别使用super命令切换用户级别,输入super口令,进入level 3,与level 0能够使用的命令进行对比。步骤八:保存配置,重新启动先使用save命令保存当前配置到设备存储介质中,再使用reboot命令重新启动系统。实验任务四:使用FTP上传下载系统文件步骤一:通过console口配置FTP用户ahptclocal-user test_ftpNew local user added.ahptc-luser-test_ftppassword simple test_ftp设置该用户使用FTP服务类型,并设置该用户的
25、优先级level为3.ahptc-luser-test_ftpservice-type ftpahptc-luser-test_ftplevel 3步骤二:打开FTP服务ahptcftp server enable步骤三:使用FTP登录使用交叉网线连接pc和路由器的以太口,在pc命令行窗口中,FTP路由器的以太口IP地址,并回车。输入FTP用户名及口令:步骤四:使用FTP上传文件使用put命令上传系统文件。实验中任意创建一个大小合适的文件来模拟系统文件,该文件应该存在于上传者的本地目录中,这里本地目录是c:documents and settingadministrator步骤五:使用FTP下
26、载文件使用FTP中的get命令下载配置文件到本地目录。实验2 网络设备基本连接与调试2.1 实验内容与目标完成本实验,您应该能够:l 掌握路由器通过串口相连的基本方法l 掌握ping、tracert系统连通检测的使用方法l 掌握debug命令的使用方法2.2 实验组图图2-1 实验组网图2.3 实验过程实验任务一:搭建基本连接环境本实验任务供学员熟悉并掌握路由器、交换机、pc的基本网络连接配置。步骤一:完成pc、交换机、路由器互连在教师指导下,完成2台路由器通过串口电缆背靠背相连;路由器以太口分别下接一台交换机;pc通过网线连接到交换机端口上。步骤二:配置IP地址将所有设备的配置清空重启开始下
27、面的配置。使用ip address命令配置路由器的串口和以太口IP地址。Rta的配置如下:H3Csysname rtartainterface GigabitEthernet 0/1rta-GigabitEthernet0/1ip add 192.168.0.1 24rta-GigabitEthernet0/1rtainterface Serial 5/0rta-Serial5/0ip address 192.168.1.1 30Rtb的配置如下:H3Csysname rtbrtbinterface GigabitEthernet 0/1rtb-GigabitEthernet0/1ip add
28、 192.168.2.1 24rtbinterface Serial 5/0rtb-Serial5/0ip add 192.168.1.2 30Pca的网络IP地址设置如下:Pca通过二层交换机连接到路由器接口G0/1,那么pca的网关地址应该设置为路由器的接口G0/1的IP地址。实验任务二:使用ping命令检查连通性步骤一:rta ping rtb通过超级终端登入到rta后,ping rtb的串口S6/0,检查路由器之间串口的连通性。rtaping 192.168.1.2 PING 192.168.1.2: 56 data bytes, press CTRL_C to break Reply
29、 from 192.168.1.2: bytes=56 Sequence=1 ttl=255 time=26 ms Reply from 192.168.1.2: bytes=56 Sequence=2 ttl=255 time=26 ms Reply from 192.168.1.2: bytes=56 Sequence=3 ttl=255 time=26 ms Reply from 192.168.1.2: bytes=56 Sequence=4 ttl=255 time=25 ms Reply from 192.168.1.2: bytes=56 Sequence=5 ttl=255 t
30、ime=25 ms - 192.168.1.2 ping statistics - 5 packet(s) transmitted 5 packet(s) received 0.00% packet lossround-trip min/avg/max = 25/25/26 ms结果显示,rta收到ICMP的echo reply报文,rta可以ping通rtb。反之亦然。查看路由器ping命令携带的参数:ping ? -a Select source IP address -c Specify the number of echo requests to be sent -f Specify
31、packets not to be fragmented -h Specify TTL value for echo requests to be sent -i Select the interface to send the packets -m Specify the interval in milliseconds to send packets -n Numeric output only. No attempt will be made to lookup host addresses for symbolic names -p No more than 8 pad hexadec
32、imal characters to fill out the sent packet. For example, -p f2 will fill the sent packet with f and 2 repeatedly -q Quiet output. Nothing will be displayed except for the summary lines. -r Record route. Include the RECORD_ROUTE option in the ECHO_REQUEST packets and display the route -s Specify the
33、 number of data bytes to be sent -t Specify the time in milliseconds to wait for each reply -tos Specify TOS value for echo requests to be sent -v Display the received ICMP packets other than ECHO-RESPONSE packets. STRING IP address or hostname of a remote system Ip IP Protocol ipv6 IPv6 Protocol例如,
34、可以使用参数-c来设定发送50个ping报文:ping -c 50 192.168.1.2可以使用-s参数来设定发送ping报文的字节为512bytes:ping -s 512 192.168.1.2 PING 192.168.1.2: 512 data bytes, press CTRL_C to break Reply from 192.168.1.2: bytes=512 Sequence=1 ttl=255 time=142 ms Reply from 192.168.1.2: bytes=512 Sequence=2 ttl=255 time=142 ms Reply from 19
35、2.168.1.2: bytes=512 Sequence=3 ttl=255 time=141 ms Reply from 192.168.1.2: bytes=512 Sequence=4 ttl=255 time=141 ms Reply from 192.168.1.2: bytes=512 Sequence=5 ttl=255 time=142 ms - 192.168.1.2 ping statistics - 5 packet(s) transmitted 5 packet(s) received 0.00% packet lossround-trip min/avg/max =
36、 141/141/142 ms也可以使用参数-a来设定ping报文的源地址,在网络调试中常常使用加源地址ping来检查网络的连通性。这里使用rta接口S5/0地址为源地址,ping rtb S5/0:ping -a 192.168.1.1 192.168.1.2 PING 192.168.1.2: 56 data bytes, press CTRL_C to break Reply from 192.168.1.2: bytes=56 Sequence=1 ttl=255 time=26 ms Reply from 192.168.1.2: bytes=56 Sequence=2 ttl=25
37、5 time=26 ms Reply from 192.168.1.2: bytes=56 Sequence=3 ttl=255 time=26 ms Reply from 192.168.1.2: bytes=56 Sequence=4 ttl=255 time=25 ms Reply from 192.168.1.2: bytes=56 Sequence=5 ttl=255 time=26 ms - 192.168.1.2 ping statistics - 5 packet(s) transmitted 5 packet(s) received 0.00% packet lossroun
38、d-trip min/avg/max = 25/25/26 ms加源地址ping时,只能使用设备自身的本地接口地址。步骤二:pca ping pcb进入pca命令行窗口,ping rta的G0/1口和S5/0口地址。步骤三:pca ping pcb进入pca命令行窗口,ping pcb的IP地址。结果显示,pca无法ping通pcb的IP地址。这是为什么呢?让我们一步一步来排查为什么ping不通首先,pca ping rta的G0/1和S5/0口,结果显示可以ping通。其次,pca ping rtb的S5/0口,结果显示无法ping通。最后,pca ping pcb,结果显示无法ping通。
39、结果证明,由于pca发送给rtb和pcb的ICMP请求报文(echo request),没有收到回应报文(echo reply)。在rta上使用display ip routing-table命令查看一下rta的路由表:rtadisplay ip routing-table Routing Tables: Public Destinations : 7 Routes : 7Destination/Mask Proto Pre Cost NextHop Interface127.0.0.0/8 Direct 0 0 127.0.0.1 InLoop0127.0.0.1/32 Direct 0 0
40、 127.0.0.1 InLoop0192.168.0.1/24 Direct 0 0 192.168.0.1 GE0/1192.168.0.1/32 Direct 0 0 127.0.0.1 InLoop0192.168.1.0/30 Direct 0 0 192.168.1.1 S5/0192.168.1.1/32 Direct 0 0 127.0.0.1 InLoop0192.168.1.2/32 Direct 0 0 192.168.1.2 S5/0在路由表destination项中,没有看到192.168.2.0表项,所以rta当收到pca发送给pcb的ping报文后,不知道如何转发
41、,会丢弃该报文。结果就是pca无法ping通pcb。但是在路由表中,有具体路由表项192.168.1.2,为什么pca无法ping通rtb的串口呢?因为rtb的路由表项中没有192.168.0.0表项,所以虽然rta将pca ping请求报文发送给rtb,但是rtb不知道如何转发ping的回应报文给pca。所以,pca也无法ping通rtb的串口。步骤五:配置静态路由使用ip route-static命令分别在路由器rta和rtb上配置静态路由,目的网段为对端路由器与pc的互连网段,并将路由下一跳指向对端路由器的接口地址;Rta上配置:rtaip route-static 192.168.2.
42、0 255.255.255.0 192.168.1.2Rtb上配置:rtbip route-static 192.168.0.0 255.255.255.0 192.168.1.1步骤六:pca ping pcb可见,在rta和rtb上配置完静态路由后,pca可以ping通pcb。实验任务三:使用tracert命令检查连通性通过使用tracert命令,用户可以查看报文从源设备传送到目的设备所经过的路由节点。当网络出现故障时,用户可以使用该命令分析出现故障的网络节点。步骤一:在rta上tracert pcb在rta上执行tracert pcb的IP地址rtatracert 192.168.2.1
43、0 traceroute to 192.168.2.10(192.168.2.10) 30 hops max,40 bytes packet, press CTRL_C to break 1 192.168.1.2 17 ms 16 ms 17 ms 2 192.168.2.10 18 ms 19 ms 18 ms结果显示第一跳为rtb,第二跳为pcb。查看路由器tracert命令携带的参数:tracert ? -a Select source IP address -f First time to live -m Maximum time to live -p UDP port number
44、 -q Number of probe packets -w Timeout in milliseconds to wait for each reply STRING IP address or hostname of a remote system ipv6 IPv6 Protocol实验任务四:使用debug命令查看调试信息步骤一:开启rta终端对信息的监视和显示功能在rta上执行terminal monitor用于开启终端对系统信息的监视功能,执行命令terminal debugging用于开启终端对调试信息的显示功能。terminal monitor % Current termin
45、al monitor is onterminal debugging % Current terminal debugging is on步骤二:在rta上执行命令debug ip icmp用于开启系统ICMP模块的调试功能。debugging ip icmp步骤三:在rta上ping rtb,观察调试信息输出在rta上ping rtb的串口地址,连续发送10个ping报文。ping -c 10 192.168.1.2步骤四:关闭调试开关调试结束后,使用undo debugging all命令,关闭所有模块的调试开关。实验3 配置VLAN3.1 实验内容与目标完成本实验,您应该能够:l 掌握V
46、LAN的基本工作原理l 掌握access链路端口和trunk链路端口的基本配置3.2 实验组网图图3-1 VLAN实验环境图3.3 实验过程实验任务一:配置access链路端口本实验任务通过在交换机上配置access链路端口而使pc间处于不同VLAN,隔离pc间的访问,从而使学生加深对access链路端口的理解。步骤一:建立物理连接按照图3-1进行连接,并检查设备的软件版本及配置信息,确保各设备软件版本符合要求,所有配置为初始状态。如果配置不符合要求,请在用户模式下擦除设备中的配置文件,然后重启设备以使系统采用缺省的配置参数进行初始化。以上步骤会用到以下命令:display versionre
47、set saved-configurationreboot步骤二:观察缺省VLAN在交换机上查看VLAN,如下所示:swadisplay vlan Total 1 VLAN exist(s). The following VLANs exist: 1(default)swadisplay vlan 1 VLAN ID: 1 VLAN Type: static Route Interface: not configured Description: VLAN 0001 Tagged Ports: none Untagged Ports: Ethernet1/0/1 Ethernet1/0/2 E
48、thernet1/0/3 Ethernet1/0/4 Ethernet1/0/5 Ethernet1/0/6 Ethernet1/0/7 Ethernet1/0/8 Ethernet1/0/9 Ethernet1/0/10 Ethernet1/0/11 Ethernet1/0/12 Ethernet1/0/13 Ethernet1/0/14 Ethernet1/0/15 Ethernet1/0/16 Ethernet1/0/17 Ethernet1/0/18 Ethernet1/0/19 Ethernet1/0/20 Ethernet1/0/21 Ethernet1/0/22 Ethernet
49、1/0/23 Ethernet1/0/24 GigabitEthernet1/1/1 GigabitEthernet1/1/2 GigabitEthernet1/1/3 GigabitEthernet1/1/4swadisplay interface Ethernet 1/0/1 . PVID: 1 Mdi type: auto Port link-type: access Tagged VLAN ID : none Untagged VLAN ID : 1 Port priority: 0.从以上输出可知,交换机上的缺省VLAN是vlan 1,所有的端口处于vlan 1中;端口的pvid 是
50、1,且是access链路端口类型。步骤三:配置VLAN并添加端口分别在swa和swb上创建vlan 2,并将pca和pcc所连接的ethernet 1/0/1端口添加到vlan 2中。配置swa:swavlan 2swa-vlan2port ethernet 1/0/1配置swb:swbvlan 2swb-vlan2port ethernet 1/0/1在交换机上查看有关vlan 2的信息,如下所示:swadisplay vlan Total 2 VLAN exist(s). The following VLANs exist: 1(default), 2swadisplay vlan 2 V
51、LAN ID: 2 VLAN Type: static Route Interface: not configured Description: VLAN 0002 Tagged Ports: none Untagged Ports: Ethernet1/0/1swbdisplay vlan The following VLANs exist: 1(default), 2swbdisplay vlan 2 VLAN ID: 2 VLAN Type: static Route Interface: not configured Description: VLAN 0002 Name: VLAN
52、0002 Tagged Ports: none Untagged Ports: Ethernet1/0/1步骤四:测试VLAN间的隔离我们在pc上配置IP地址,通过ping命令来测试处于不同VLAN间的pc能否互通。表3-1 IP地址表设备名称IP地址网关Pca172.16.0.1/24-Pcb172.16.0.2/24-Pcc172.16.0.3/24-Pcd172.16.0.4/24-按表3-2所示在pc上配置IP地址。配置完成后,在pca上用ping命令来测试到其他pc的互通性。其结果应该是pca与pcb不能互通,pcc和pcd不能互通。证明不同VLAN之间不能互通,连接在同一交换机上的
53、pc被隔离了。实验任务二:配置trunk链路端口本任务是在交换机间配置trunk链路端口,来使同一VLAN中的pc能够跨交换机访问。通过本实验,学生应该能够掌握trunk链路端口的配置及作用。、步骤一:跨交换机VLAN互通测试在上个实验中,pca和pcc都属于vlan 2。在pca上使用ping命令来测试于pcc能否互通。其结果应该不能,如下所示:C:Documents and SettingsAdministratorping 172.168.0.3Pinging 172.168.0.3 with 32 bytes of data:Destination host unreachable.D
54、estination host unreachable.Destination host unreachable.Destination host unreachable.Ping statistics for 172.168.0.3:Packets: Sent = 4, Received = 0, Lost = 4 (100% loss),Pca与pcc之间不能互通。因为交换机之间的端口Ethernet 1/0/24,是access链路端口,且属于vlan 1,不允许vlan 2的数据帧通过。要想让vlan 2数据帧通过Ethernet 1/0/24,需要设置端口为trunk链路端口。步骤二
55、:配置trunk链路端口在swa和swb上配置端口Ethernet 1/0/24为trunk链路端口。swainterface Ethernet 1/0/24swa-Ethernet1/0/24port link-type trunkswa-Ethernet1/0/24port trunk permit vlan allswbinterface Ethernet 1/0/24swb-Ethernet1/0/24port link-type trunkswb-Ethernet1/0/24port trunk permit vlan all配置完成后,查看vlan 2信息:display vlan
56、 2 VLAN ID: 2 VLAN Type: static Route Interface: not configured Description: VLAN 0002 Tagged Ports: Ethernet1/0/24 Untagged Ports:Ethernet1/0/1可以看到,vlan 2中包含了端口Ethernet 1/0/24,且数据帧是以带有标签的形式通过端口的。再查看Ethernet 1/0/24信息:display interface Ethernet 1/0/24 . PVID: 1 Mdi type: auto Port link-type: trunk VL
57、AN passing : 1(default vlan), 2 VLAN permitted: 1(default vlan), 2-4094 Trunk port encapsulation: IEEE 802.1q.从以上信息可知,端口的pvid值是1,端口类型是trunk,允许所有的vlan(14096)通过,但实际上时vlan 1和vlan 2能够通过此端口。Swb上vlan和端口Ethernet 1/0/24的信息与此类似,不再赘述。步骤三:跨交换机VLAN互通测试在pca上用ping命令来测试于pcc能否互通。其结果应该是能够互通,如下所示:C:Documents and SettingsAdministratorping 172.16.0.3Pinging 172.16.0.3 with 32 bytes of data:Reply from 172.16.0.3: bytes=32 tim
- 温馨提示:
1: 本站所有资源如无特殊说明,都需要本地电脑安装OFFICE2007和PDF阅读器。图纸软件为CAD,CAXA,PROE,UG,SolidWorks等.压缩文件请下载最新的WinRAR软件解压。
2: 本站的文档不包含任何第三方提供的附件图纸等,如果需要附件,请联系上传者。文件的所有权益归上传用户所有。
3.本站RAR压缩包中若带图纸,网页内容里面会有图纸预览,若没有图纸预览就没有图纸。
4. 未经权益所有人同意不得将文件中的内容挪作商业或盈利用途。
5. 装配图网仅提供信息存储空间,仅对用户上传内容的表现方式做保护处理,对用户上传分享的文档内容本身不做任何修改或编辑,并不能对任何下载内容负责。
6. 下载文件中如有侵权或不适当内容,请与我们联系,我们立即纠正。
7. 本站不保证下载资源的准确性、安全性和完整性, 同时也不承担用户因使用这些下载资源对自己和他人造成任何形式的伤害或损失。
