 PostgresXL使用说明文档

《PostgresXL使用说明文档》由会员分享,可在线阅读,更多相关《PostgresXL使用说明文档(29页珍藏版)》请在装配图网上搜索。
1、Postgres-XL使用说明文档一、知识点介绍Postgres-XL是一个基于PostgreSQL数据库的横向扩展开源SQL数据库集群,XL代表eXtensible Lattice,即可扩展的PG“格子”之意,以下简称PGXL。官方称其既适合写操作压力较大的OLTP OLTP 联机事务处理过程(On-Line Transaction Processing),也称为面向交易的处理过程,其基本特征是前台接收的用户数据可以立即传送到计算中心进行处理,并在很短的时间内给出处理结果,是对用户操作快速响应的方式之一。OLTP系统强调数据库内存效率,强调内存各种指标的命令率,强调绑定变量,强调并发操作;应
2、用,又适合读操作为主的大数据应用。它的前身是Postgres-XC(简称PGXC),PGXC是在PG的基础上加入了集群功能,主要适用于OLTP OLAP,也叫联机分析处理(On-line Analytical Processing)系统,有的时候也叫DSS决策支持系统,就是我们说的数据仓库。在这样的系统中,语句的执行量不是考核标准,因为一条语句的执行时间可能会非常长,读取的数据也非常多。所以,在这样的系统中,考核的标准往往是磁盘子系统的吞吐量(带宽),如能达到多少MB/s的流量。OLAP系统则强调数据分析,强调SQL执行市场,强调磁盘I/O,强调分区等。应用;PGXL是在PGXC的基础上的升级
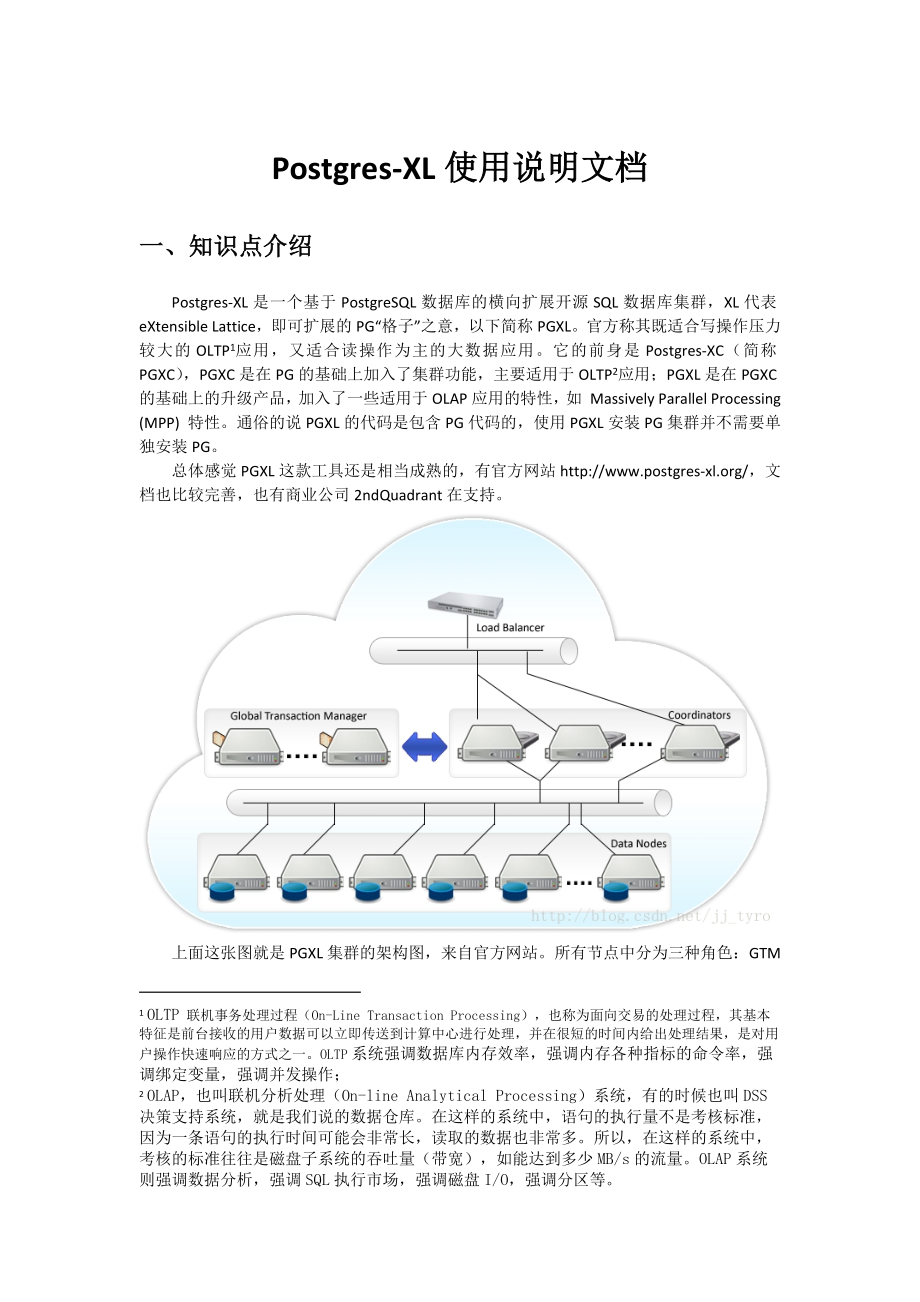
3、产品,加入了一些适用于OLAP应用的特性,如 Massively Parallel Processing (MPP) 特性。通俗的说PGXL的代码是包含PG代码的,使用PGXL安装PG集群并不需要单独安装PG。总体感觉PGXL这款工具还是相当成熟的,有官方网站http:/www.postgres-xl.org/,文档也比较完善,也有商业公司2ndQuadrant在支持。上面这张图就是PGXL集群的架构图,来自官方网站。所有节点中分为三种角色:GTM(全局事务管理器)、Coordinator(协调器)和Datanode(数据节点)。需要注意一点是图中的Load Balance组件并不属于PGXL
4、集群本身,需要其他负载均衡工具实现。GTM:全局事务控制节点,保证集群数据的一致性,与Coordinator节点和Datanode节点不断通信,是整个集群的核心节点,只存在一个,可以存在一个GTM Standby节点,对GTM实时备份。GTM一旦故障,整个集群立刻无法访问,此时可以切换到GTM Standby节点上。如果部署了GTM Standby节点,就应该同时部署GTM Proxy,一般和Coordinator、Datanode部署在同一台服务器上。GTM Proxy的作用代理Coordinator和Datanode对GTM的访问,起到减轻GTM负载的作用,另外一个重要的作用是帮助完成GT
5、M的故障切换,当GTM节点发生故障后,GTM Standby成为新的GTM,此时Coordinator和Datanode节点并不需要重新指定GTM地址,只需要GTM Proxy重新连接到新的GTM地址即可。Coordinator:接收数据访问请求的节点,本质上是由PG后台进程组成。接收的一条查询后,Coordinator节点执行查询计划,然后会根据查询数据涉及的数据节点将查询分发给相关的数据节点。写入数据时,也会根据不同的数据分布策略将数据写入相关的节点。可以说Coordinator节点上保存着集群的全局数据位置。Coordinator节点可以任意扩展,各个节点之间除了访问地址不同以外是完全对
6、等的,通过一个节点更新的数据可以在另一个节点上立刻看到。每个Coordinator节点可以配置一个对应的standby节点,避免单点故障。Datanode:实际存取数据的节点,接收Coordinator的请求并执行SQL语句存取数据,节点之间也会互相通信。一般的,一个节点上的数据并不是全局的,数据节点不直接对外提供数据访问。一个表的数据在数据节点上的分布存在两种模式:复制模式和分片模式,复制模式下,一个表的数据在指定的节点上存在多个副本;分片模式下,一个表的数据按照一定的规则分布在多个数据节点上,这些节点共同保存一份完整的数据。这两种模式的选择是在创建表的时候执行CREATE TABLE语句指
7、定的,具体语法如下:CREATE TABLE table_name(.)DISTRIBUTE BY HASH(col)|MODULO(col)|ROUNDROBIN|REPLICATIONTO NODE(nodename1,nodename2.)可以看到,如果DISTRIBUTE BY 后面是REPLICATION,则是复制模式,其余则是分片模式,HASH指的是按照指定列的哈希值分布数据,MODULO指的是按照指定列的取摩运算分布数据,ROUNDROBIN指的是按照轮询的方式分布数据。TO NODE指定了数据分布的节点范围,如果没有指定则默认所有数据节点参与数据分布。如果没有指定分布模式,即使
8、用普通的CREATE TABLE语句,PGXL会默认采用分片模式将数据分布到所有数据节点。二、安装说明1. 下载安装包https:/www.postgres-xl.org/download/当前最新版本为:postgres-xl-9.5r1.6.tar.bz22. 主机规划服务器分配:(手动配置分配)操作系统IP地址主机名称节点类型其他Kylin3.2192.168.51.2scada_server1gtm,coordinator1,coordinator2Kylin3.2192.168.51.125scada_server2datanode1,datanode2Kylin3.2192.168
9、.51.120scada_server3datanode3,datanode4服务器分配:(自动配置分配)操作系统IP地址主机名称节点类型其他Kylin3.2192.168.51.2scada_server1gtmKylin3.2192.168.51.125scada_server2coordinator1,datanode1,datanode2Kylin3.2192.168.51.120scada_server3coordinator2,datanode3,datanode4各个节点划分:(手动配置划分)节点名称所在机器节点类型端口号连接池端口号gtmscada_server1192.168
10、.51.2gtm6666coord1scada_server1192.168.51.2coordinator53016701coord2scada_server1192.168.51.2coordinator53026702dn1scada_server2192.168.51.125datanode54016801dn2scada_server2192.168.51.125datanode54026802dn3scada_server3192.168.51.120datanode54016801dn4scada_server4192.168.51.120datanode54026802各个节点
11、划分:(自动配置划分)节点名称所在机器节点类型端口号连接池端口号gtmscada_server1192.168.51.2gtm20001gtm_pxyscada_server2192.168.51.125gtm_proxy20001coord1scada_server2192.168.51.125coordinator2000420010gtm_pxyscada_server3192.168.51.120gtm_proxy20001coord2scada_server3192.168.51.120coordinator2000420010dn1scada_server2192.168.51.1
12、25datanode2000820012dn2scada_server2192.168.51.125datanode2000920013dn3scada_server3192.168.51.120datanode2000820012dn4scada_server4192.168.51.120datanode20009200133. 修改节点Host配置每个节点已root用户执行下面操作:# vi /etc/hosts在文件后面追加以下内容:192.168.51.2 scada_server1192.168.51.125 scada_server2192.168.51.120 scada_ser
13、ver34. 安装依赖软件包需要安装的依赖包:openssh-clients, flex, bison, readline-devel, zlib-devel, openjade, docbook-style-dsssl, gcc检查需要依赖的包:# rpm -qa |grep xxx如果上述命令能够输出包的信息则说明该包已经存在。(kylin3.2操作系统自带上述所有包!)5. 卸载系统自带PostgreSQL数据库以root用户执行:查询系统是否安装自带软件:查询:# rpm -qa |grep postgresql若有则删除已安装软件:删除:# rpm -qa |grep postgre
14、sql | xargs rpm -e -nodeps查询是否删除干净:查询:# rpm -qa |grep postgresql6. 每个节点添加postgres用户以root用户执行:建立组:# groupadd postgres建立用户:# useradd -m -d /home/postgres postgres -g postgres初始化密码:# passwd postgres输入密码:abcd.135(举例)注:如果需要删除postgres用户,可以以root用户执行命令:# userdel -r postgres7. 配置无密码登录既需要配置postgres用户,还需要配置roo
15、t用户。- root 用户 - scada_server1节点root scada_server1 # ssh-keygenroot scada_server1 # ssh-copy-id -i /.ssh/id_rsa.pub rootscada_server1root scada_server1# ssh-copy-id -i /.ssh/id_rsa.pub rootscada_server2root scada_server1# ssh-copy-id -i /.ssh/id_rsa.pub rootscada_server3- scada_server2节点root scada_se
16、rver2# ssh-keygenroot scada_server2# ssh-copy-id -i /.ssh/id_rsa.pub root scada_server2root scada_server2# ssh-copy-id -i /.ssh/id_rsa.pub root scada_server1root scada_server2# ssh-copy-id -i /.ssh/id_rsa.pub root scada_server3- scada_server3节点root scada_server3# ssh-keygenroot scada_server3# ssh-co
17、py-id -i /.ssh/id_rsa.pub root scada_server3root scada_server3# ssh-copy-id -i /.ssh/id_rsa.pub root scada_server1root scada_server3# ssh-copy-id -i /.ssh/id_rsa.pub root scada_server2- 用户 postgres - scada_server1节点postgres scada_server1$ ssh-keygenpostgres scada_server1$ ssh-copy-id -i /.ssh/id_rsa
18、.pub postgres scada_server1postgres scada_server1$ ssh-copy-id -i /.ssh/id_rsa.pub postgres scada_server2postgres scada_server1$ ssh-copy-id -i /.ssh/id_rsa.pub postgres scada_server3- scada_server2节点postgres scada_server2$ ssh-keygenpostgres scada_server2$ ssh-copy-id -i /.ssh/id_rsa.pub postgres s
19、cada_server2postgres scada_server2$ ssh-copy-id -i /.ssh/id_rsa.pub postgres scada_server1postgres scada_server2$ ssh-copy-id -i /.ssh/id_rsa.pub postgres scada_server3- scada_server3节点postgres scada_server3$ ssh-keygenpostgres scada_server3$ ssh-copy-id -i /.ssh/id_rsa.pub postgres scada_server3pos
20、tgres scada_server3$ ssh-copy-id -i /.ssh/id_rsa.pub postgres scada_server1postgres scada_server3$ ssh-copy-id -i /.ssh/id_rsa.pub postgres scada_server28. 修改内核参数执行:# vi /etc/sysctl.conf添加以下参数kernel.sem = 50100 128256000 50100 2560执行:# sysctl -p使参数生效执行:# ipcs -ls验证参数是否生效。- Semaphore Limits -max numb
21、er of arrays = 2560max semaphores per array = 50100max semaphores system wide = 128256000max ops per semop call = 50100semaphore max value = 327679. 配置防火墙9.1 关闭防火墙(以root用户执行)# service iptables stop# chkconfig iptables off -重启后生效9.2 在防火墙中开放端口具体需要开放的端口参加(主机规划部分),以5302为例:使用这些命令来永久打开一个新端口(如TCP/5302)。# s
22、udo firewall-cmd -zone=public -add-port=5302/tcp -permanent# sudo firewall-cmd -reload注:需要保证防火墙是开启的才能执行。注:查看防火墙状态命令:systemctl status firewalld注:开启防火墙:systemctl start firewalld注:关闭防火墙:systemctl stop firewalld10. 关闭SELinux查看SELinux状态,执行:# /usr/sbin/sestatus -v #如果SELinuxstatus参数为enabled即为开启状态永久关闭,执行:#
23、 vi /etc/selinux/config -重启后生效将 SELINUX=enforcing 改为 SELINUX=disabled11. 安装Postgres-XL软件11.1 执行postgrex-xl软件安装- scada_server1 节点-root scada_server1# cd /mytmproot scada_server1 mytmp# tar -jxvf postgres-xl-9.5r1.6.tar.bz2root scada_server1 mytmp# chown -R postgres:postgres postgres-xl-9.5r1.6root sc
24、ada_server1 mytmp# su - postgrespostgres scada_server1$ cd /mytmp/postgres-xl-9.5r1.6postgres scada_server1 postgres-xl-9.5r1.6$ ./configure -prefix=/home/postgres/pgxl9.5postgres scada_server1 postgres-xl-9.5r1.6$ makepostgres scada_server1 postgres-xl-9.5r1.6$ make install-安装拓展-postgres scada_serv
25、er1 postgres-xl-9.5r1.6$ cd contribpostgres scada_server1 contrib$ makepostgres scada_server1 contrib$ make install- scada_server2节点-root scada_server2# cd /mytmproot scada_server2 mytmp# tar -jxvf postgres-xl-9.5r1.6.tar.bz2root scada_server2 mytmp# chown -R postgres:postgres postgres-xl-9.5r1.6roo
26、t scada_server2 mytmp# su - postgrespostgres scada_server2 $ cd /mytmp/postgres-xl-9.5r1.6postgres scada_server2 postgres-xl-9.5r1.6$ ./configure -prefix=/home/postgres/pgxl9.5postgres scada_server2 postgres-xl-9.5r1.6$ makepostgres scada_server2 postgres-xl-9.5r1.6$ make install-安装拓展-postgres scada
27、_server2 postgres-xl-9.5r1.6$ cd contribpostgres scada_server2 contrib$ makepostgres scada_server2 contrib$ make install- scada_server3节点-root scada_server3 # cd /mytmproot scada_server3 mytmp# tar -jxvf postgres-xl-9.5r1.6.tar.bz2root scada_server3 mytmp# chown -R postgres:postgres postgres-xl-9.5r
28、1.6root scada_server3 mytmp# su - postgrespostgres scada_server3 $ cd /mytmp/postgres-xl-9.5r1.6postgres scada_server3 postgres-xl-9.5r1.6$ ./configure -prefix=/home/postgres/pgxl9.5postgres scada_server3 postgres-xl-9.5r1.6$ makepostgres scada_server3 postgres-xl-9.5r1.6$ make install-安装拓展-postgres
29、 scada_server3 postgres-xl-9.5r1.6$ cd contribpostgres scada_server3 contrib$ makepostgres scada_server3 contrib$ make install11.2 配置环境变量修改三个服务器节点的环境变量,执行以下操作:# su - postgres# vi .bashrc添加如下内容:export PGHOME=/home/postgres/pgxl9.5export PGUSER=postgresexport LD_LIBRARY_PATH=$PGHOME/lib:$LD_LIBRARY_PA
30、THexport PATH=$PGHOME/bin:$PATH效果如下图所示:使环境变量生效:# source /.bashrc验证环境变量是否生效:pg_ctl -version 输出:pg_ctl (PostgreSQL) 9.5.8 (Postgres-XL 9.5r1.6)11.3 创建 gtm、coordinator、datanode 相关目录- scada_server1节点-postgres scada_server1 $ cd $PGHOMEpostgres scada_server1 pgxl9.5$ mkdir datapostgres scada_server1 pgxl
31、9.5$ cd datapostgres scada_server1 data$ mkdir gtmpostgres scada_server1 data$ mkdir coord1postgres scada_server1 data$ mkdir coord2- scada_server2节点-postgres scada_server2 $ cd $PGHOMEpostgres scada_server2pgxl9.5$ mkdir datapostgres scada_server2pgxl9.5$ cd datapostgres scada_server2data$ mkdir dn
32、1postgres scada_server2data$ mkdir dn2- scada_server3节点-postgres scada_server3 $ cd $PGHOMEpostgres scada_server3 pgxl9.5$ mkdir datapostgres scada_server3 pgxl9.5$ cd datapostgres scada_server3 data$ mkdir dn3postgres scada_server3 data$ mkdir dn412. 手动配置PG-XL集群12.1 gtm、coordinator 初始化及配置- 初始化gtmpo
33、stgres scada_server1 $ initgtm -Z gtm -D /home/postgres/pgxl9.5/data/gtm-初始化coord1postgres scada_server1 $ initdb -D /home/postgres/pgxl9.5/data/coord1 -nodename coord1 -E UTF8 -locale=C -U postgres -W执行命令如下图所示:执行结果如下图所示:-初始化coord2postgres scada_server1 $ initdb -D /home/postgres/pgxl9.5/data/coord2
34、 -nodename coord2 -E UTF8 -locale=C -U postgres -W- 配置gtmpostgres scada_server1 $ vi /home/postgres/pgxl9.5/data/gtm/gtm.confnodename = gtmlisten_addresses = *port =6666startup = ACT- 配置 coord1、coord2postgres scada_server1 $ vi /home/postgres/pgxl9.5/data/coord1/postgresql.conf# - Connection Setting
35、s -listen_addresses = *port = 5301 #coord2这个端口改为5302max_connections = 1024# DATA NODES AND CONNECTION POOLING#-pooler_port = 6701 #coord2这个端口改为6702max_pool_size = 1024# GTM CONNECTION#-gtm_host = 192.168.51.2 #即scada_server1,也就是gtm所在的主机地址gtm_port = 6666 #gtm配置中,gtm端口号配置为6666pgxc_node_name = coord1-
36、配置文件 pg_hba.conf# local is for Unix domain socket connections onlylocal all all trust# IPv4 local connections:host all all 192.168.51.2/32 trusthost all all 192.168.51.125/32 trusthost all all 192.168.51.120/32 trusthost all all 0.0.0.0/0 md5# IPv6 local connections:host all all :1/128 trust12.2 dn1
37、、dn2、dn3、dn4 初始化及配置- scada_server2节点 -dn1初始化postgres scada_server2 $ initdb -D /home/postgres/pgxl9.5/data/dn1 -nodename dn1 -E UTF8 -locale=C -U postgres -W执行命令如图:执行结果如下图:-dn2初始化postgres scada_server2 $ initdb -D /home/postgres/pgxl9.5/data/dn2 -nodename dn2 -E UTF8 -locale=C -U postgres -W- scada_
38、server3节点 -dn3初始化postgres scada_server3 $ initdb -D /home/postgres/pgxl9.5/data/dn3 -nodename dn3 -E UTF8 -locale=C -U postgres -W-dn4初始化postgres scada_server3 $ initdb -D /home/postgres/pgxl9.5/data/dn4 -nodename dn4 -E UTF8 -locale=C -U postgres -W- scada_server2节点 - dn1 配置postgres scada_server2 $
39、 vi /home/postgres/pgxl9.5/data/dn1/postgresql.confCONNECTIONS AND AUTHENTICATION#-listen_addresses = *port =5401 #dn2,dn3,dn4配置文件分别改为5402、5401、5402max_connections = 1024# DATA NODES AND CONNECTION POOLING#-pooler_port = 6801 #dn2,dn3,dn4配置文件分别改为6802、6801、6802#同一台机器要使用不同的端口,如dn1,dn2在同一台机器pgxlsrv2上分别
40、是6801,6802#dn3,dn4在pgxlsrv3上端口号也是6801,6802。就是同一机器端口号不同即可。max_pool_size = 1024# GTM CONNECTION#-gtm_host = 192.168.51.2 # gtm所在的scada_server1的ip地址gtm_port = 6666 #gtm端口号pgxc_node_name = dn1 #dn2,dn3,dn4配置文件分别改为dn2、dn3、dn4- 配置文件 pg_hba.conf# local is for Unix domain socket connections onlylocal all al
41、l trust# IPv4 local connections:host all all 192.168.51.2/32 trusthost all all 192.168.51.125/32 trusthost all all 192.168.51.120/32 trusthost all all 0.0.0.0/0 md5# IPv6 local connections:host all all :1/128 trust12.3 启动Postgres-XL-启动gtm (scada_server1)postgres scada_server1$ gtm_ctl start -Z gtm -
42、D /home/postgres/pgxl9.5/data/gtm-启动datanode (scada_server2)postgres scada_server2 $ pg_ctl start -Z datanode -D /home/postgres/pgxl9.5/data/dn1postgres scada_server2 $ pg_ctl start -Z datanode -D /home/postgres/pgxl9.5/data/dn2-启动datanode (scada_server3)postgres scada_server3 $ pg_ctl start -Z data
43、node -D /home/postgres/pgxl9.5/data/dn3postgres scada_server3 $ pg_ctl start -Z datanode -D /home/postgres/pgxl9.5/data/dn4-启动coordinator (scada_server1)postgres scada_server1 $ pg_ctl start -Z coordinator -D /home/postgres/pgxl9.5/data/coord1postgres scada_server1 $ pg_ctl start -Z coordinator -D /
44、home/postgres/pgxl9.5/data/coord21)启动顺序gtm+(gtm_standby)+(gtm_proxy)+datanode+coordinator2)停止顺序coordinator+datanode+(gtmproxy)+(gtm_standby)+gtm停止节点指令,举例如下:$pg_ctlstopD/home/postgres/pgxl9.5/data/coord1Zcoordinatormfast$pg_ctlstopD/home/postgres/pgxl9.5/data/coord2Zcoordinatormfast$pg_ctlstopD/home/
45、postgres/pgxl9.5/data/dn1Zdatanodemfast$pg_ctlstopD/home/postgres/pgxl9.5/data/dn2Zdatanodemfast$gtm_ctlstopD/home/postgres/pgxl9.5/data/gtmZgtmmfast12.4 Postgres-XL集群配置- 集群配置 -配置coord1节点,以postgres用户下进入psql。coord1配置端口号是5301,直接以psql加端口号进入配置postgres scada_server1 $ psql -p 5301psql (PGXL 9.5r1.6, base
46、d on PG 9.5.6 (Postgres-XL 9.5r1.6)Type help for help.postgres=# select * from pgxc_node;postgres=# alter node coord1 with (type=coordinator,host=192.168.51.2, port=5301);postgres=# create node coord2 with (type=coordinator,host=192.168.51.2, port=5302);postgres=# create node dn1 with (type=datanode
47、, host=192.168.51.125, port=5401, primary, preferred );postgres=# create node dn2 with (type=datanode, host=192.168.51.125,port=5402);postgres=# create node dn3 with (type=datanode, host=192.168.51.120,port=5401);postgres=# create node dn4 with (type=datanode, host=192.168.51.120,port=5402);postgres
48、=# select pgxc_pool_reload();postgres=# select * from pgxc_node;-配置coord2节点,以postgres用户下进入psql。coord2配置端口号是5302,直接以psql加端口号进入配置postgres scada_server1 $ psql -p 5302psql (PGXL 9.5r1.6, based on PG 9.5.6 (Postgres-XL 9.5r1.6)Type help for help.postgres=# select * from pgxc_node;postgres=# alter node c
49、oord2 with (type=coordinator,host=192.168.51.2, port=5302);postgres=# create node coord1 with (type=coordinator,host=192.168.51.2, port=5301);postgres=# create node dn1 with (type=datanode, host=192.168.51.125,port=5401,primary, preferred );postgres=# create node dn2 with (type=datanode, host=192.16
50、8.51.125, port=5402);postgres=# create node dn3 with (type=datanode, host=192.168.51.120, port=5401);postgres=# create node dn4 with (type=datanode, host=192.168.51.120, port=5402);postgres=# select pgxc_pool_reload();postgres=# select * from pgxc_node;- 配置数据节点(scada_server2) - -dn1postgres scada_se
51、rver2 $ psql -p 5401psql (PGXL 9.5r1.6, based on PG 9.5.6 (Postgres-XL 9.5r1.6)Type help for help.postgres=# select * from pgxc_node;postgres=# create node coord1 with (type=coordinator,host=192.168.51.2, port=5301);postgres=# create node coord2 with (type=coordinator,host=192.168.51.2, port=5302);p
52、ostgres=# alter node dn1 with (type=datanode, host=192.168.51.125,port=5401,primary, preferred);postgres=# create node dn2 with (type=datanode, host=192.168.51.125,port=5402);postgres=# create node dn3 with (type=datanode, host=192.168.51.120,port=5401);postgres=# create node dn4 with (type=datanode
53、, host=192.168.51.120,port=5402);postgres=# select pgxc_pool_reload();postgres=# select * from pgxc_node;-dn2postgres scada_server2 $ psql -p 5402psql (PGXL 9.5r1.6, based on PG 9.5.6 (Postgres-XL 9.5r1.6)Type help for help.postgres=# select * from pgxc_node;postgres=# create node coord1 with (type=
54、coordinator,host=192.168.51.2, port=5301);postgres=# create node coord2 with (type=coordinator,host=192.168.51.2, port=5302);postgres=# alter node dn2 with (type=datanode, host=192.168.51.125,port=5402);postgres=# create node dn1 with (type=datanode, host=192.168.51.125,port=5401,primary, preferred)
55、;postgres=# create node dn3 with (type=datanode, host=192.168.51.120,port=5401);postgres=# create node dn4 with (type=datanode, host=192.168.51.120,port=5402);postgres=# select pgxc_pool_reload();postgres=# select * from pgxc_node;- 配置数据节点(scada_server3) -dn3postgres scada_server3 $ psql -p 5401psql
56、 (PGXL 9.5r1.6, based on PG 9.5.6 (Postgres-XL 9.5r1.6)Type help for help.postgres=# select * from pgxc_node;postgres=# create node coord1 with (type=coordinator,host=192.168.51.2, port=5301);postgres=# create node coord2 with (type=coordinator,host=192.168.51.2, port=5302);postgres=# alter node dn3
57、 with (type=datanode, host=192.168.51.120,port=5401);postgres=# create node dn1 with (type=datanode, host=192.168.51.125,port=5401,primary, preferred);postgres=# create node dn2 with (type=datanode, host=192.168.51.125,port=5402);postgres=# create node dn4 with (type=datanode, host=192.168.51.120,port=5402);postgres=# select pgxc_pool_reload();postgres=# select * from pg
- 温馨提示:
1: 本站所有资源如无特殊说明,都需要本地电脑安装OFFICE2007和PDF阅读器。图纸软件为CAD,CAXA,PROE,UG,SolidWorks等.压缩文件请下载最新的WinRAR软件解压。
2: 本站的文档不包含任何第三方提供的附件图纸等,如果需要附件,请联系上传者。文件的所有权益归上传用户所有。
3.本站RAR压缩包中若带图纸,网页内容里面会有图纸预览,若没有图纸预览就没有图纸。
4. 未经权益所有人同意不得将文件中的内容挪作商业或盈利用途。
5. 装配图网仅提供信息存储空间,仅对用户上传内容的表现方式做保护处理,对用户上传分享的文档内容本身不做任何修改或编辑,并不能对任何下载内容负责。
6. 下载文件中如有侵权或不适当内容,请与我们联系,我们立即纠正。
7. 本站不保证下载资源的准确性、安全性和完整性, 同时也不承担用户因使用这些下载资源对自己和他人造成任何形式的伤害或损失。
