 JWL-UL-10A(英文3串12V

《JWL-UL-10A(英文3串12V》由会员分享,可在线阅读,更多相关《JWL-UL-10A(英文3串12V(5页珍藏版)》请在装配图网上搜索。
1、 . . . . JWL-UL MODELSolar LED Constant Current Controller Operating Instructions(12V)Main features:1. A new voltage-boosting, constant current source inside it and its efficiency is up to 91%-96%.2. The output current are adjustable (dimming value of 10%-90%) on the machine andthere are four times
2、to control light working. 3. Utilize SOC to exactly calculate the state of battery charging and discharging that can efficiently extending the battery life. 4. It is with over-charge, over discharge, electronic short circuit and overload protection and LED open circuit and short-circuit protection t
3、hat will not damage any other parts.5. It adopts PWM charging mode that 3%-6% higher than without PWM charging to extend working time. Also it has temperature compensation function.6. Visual LED display indicates the current, working time and power to make users understood the light working conditio
4、n.7. All controllers are used industrial chips ( only withI industrial-grade controller), can be regularly working in cold, hot, humid environment . At the same time, are used the crystal oscillator to precisely timing control.8. Use the double-digit LED display and settings, one button to complete
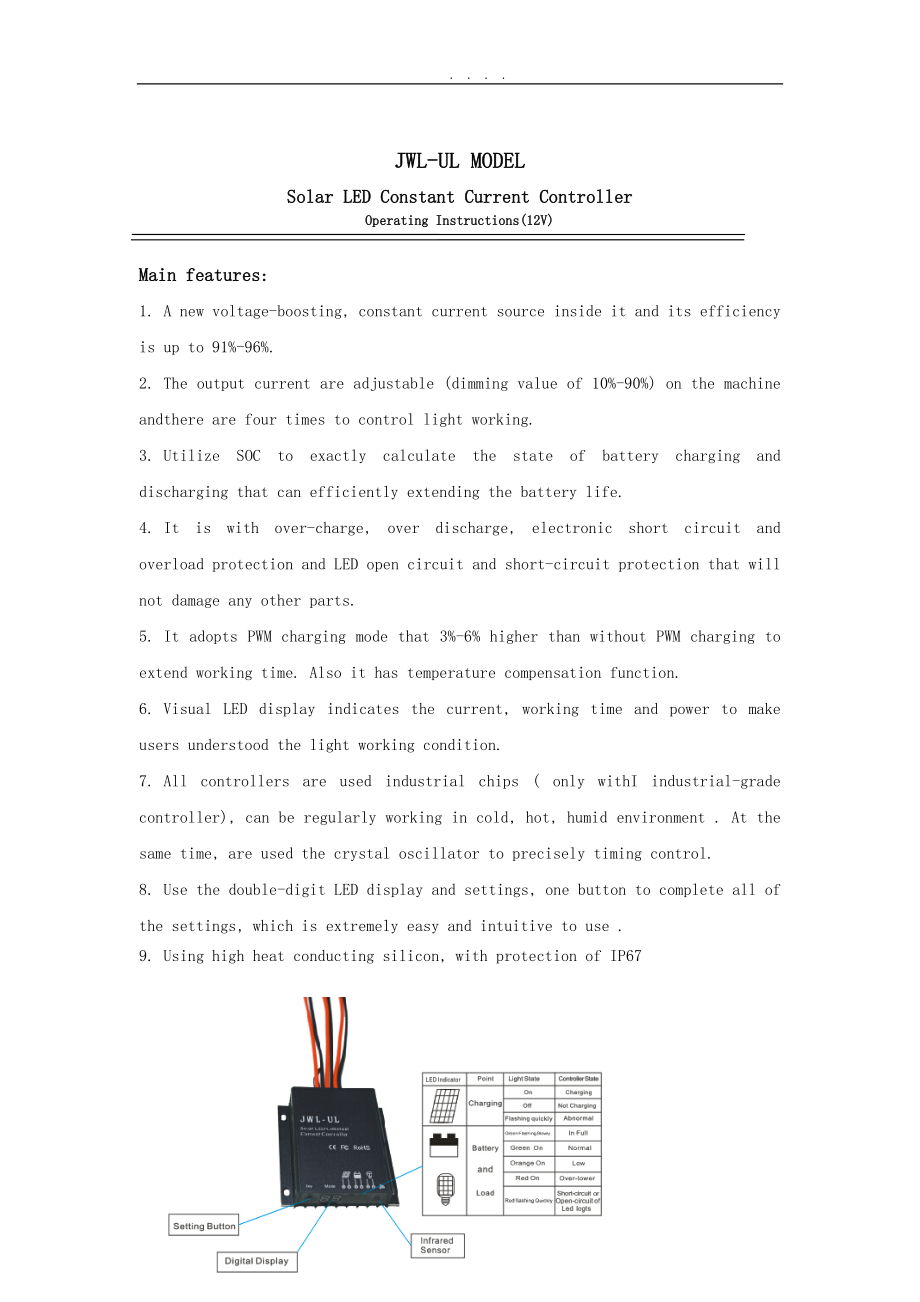
5、all of the settings, which is extremely easy and intuitive to use .9. Using high heat conducting silicon, with protection of IP67 Instructions for use: This section provides a brief overview of how to get started using the controller. However, please review the entire manual to ensure best performan
6、ce and years of trouble-free service. 1. Mount the controller to a vertical surface. Allow space above and below the controller for air flow.2. Make sure the PV and load currents will not exceed the rating of the controller being installed.3. Firmly fixed to the controller, mounting holes as shown:D
7、imensions:90*80*23(mm) Installation size:70*65*3.5(mm) N.W.: 0.26kg, G.W.: 0.28kg 4. Wire preparation: We recommend using multi-strand insulated copper wire. First determine the wire length, in the circumstances to ensure that the installation location to minimize the connection length to reduce pow
8、er consumption. .5. Connect the Battery terminals on the controller, pls note the + and - poles, do not reverse. If properly connected, the indicator (2) should be bright,. Otherwise, need to check if it is connected.6. Connect Solar wires. connect wires to controller, then to solar panel, also pay
9、attention to + and - poles, do not reverse, if there is sunshine, solar indicator light should be on.7. Connected Load wires, pls note that + and - poles, in case to break out LED lights.8. Press the BUTTON 70 and LED will be on to verify the system connecting, neednt to set 71 again. Connecting Ins
10、truction:Type In series NIn parallels KMax power of solar panel Max power of LED lights JWL-UL-12V5N181K9170W40WNote: pls select right series¶llels of LED lights according to the above, or LED lights or controller may be broken down. Adjustable Lighting Control Options Digital displayFunction(Te
11、ns)Related parameterFormula(Units *)TensUnits00-18Full power time 0-18 hours*1 hr20-9Second time0-9 hours*1 hr30-9Third time0-9 hours*1 hr41-9LED parallels1-9 parallels*300MA50-9 Dimming value10%-90% full power*10%60-9Dimming value 10%-90% full power*10%70-9Time after dusk0-27 minutes*3 min80-8Time
12、to dawn0-4 hours*0.5 hrRepresentatives of the two-digital control functions: Such as: Lamp is 30W, with lamp is 15 series and 2 parallels. Working hours are: 3 hours of full power , 3 hours of 60% power, 4 hours of 40% power. 6 minutes of delaying to turn on the lights and 1 hour of turning on light
13、 before sunrise. 1. Firstly design the lamps parallels, and then set to 42 standing for 2parallels and the output current is 1.5A 2. Set the ratio of the second period to 56 standing for 60% power3. Set the ratio of the third period to 64 standing for 40% power 4, set the delay time to turn on the l
14、ights to 72, which means after 6 minutes to turn on light. 5, Set the full power to 06, after 6 hours of full power will enter to 60%power . 6, Set the second time to 23, after 3 hours of 60% power will enter to 40%power . 7, Set the third time to 34, after 4 hours of 40% power will turn off the lig
15、ht. 8, Set the time to 82, means that the light wilAdjustable Lighting Control Options Digital displayFunctionCommon breakdown and HandlingWhen there is the following breakdown, please check it according to the following methods.Common Breakdown Handing When sunlight exposes directly to solar panel,
16、solar indicator isnt on;Check whether the two terminals of solar PV are correct and reliable;Battery indicator (1) is flashing quickly;System is over voltage. Battery open circuit, check the battery is connected reliablly or charging circuit is damaged;Load indicator (3) is on, but no output;Check i
17、f load is properly connected and reliable;Load indicator (3) is flashing quickly and no output;There is short circuit, please check output lines. After removing all loads, click button, after 30 seconds, the controller back to normal output;Load indicator (3) is slowly flashing, and no outputLoad po
18、wer exceeds rated power, pls reduce loads power, click the button, after 30 seconds, controller worksLoad indicator (3) is red, and no output;Battery is over-discharging, after charging full, controller automatically worksTechnical Indicators:modelJWL-UL Rated charge current10ARated load current30MA
19、-1.5A(adjustable)Rated load voltageBattery voltage-50V(Automatic)LED constant current efficiency 92.8% (typically 94.5%) System voltage12VOverload, short circuit protection1.25 times the rated current is for 60 seconds. 1.5 times the rated current is for 5 seconds when the overload action. More than
20、 3 times the rated current of short circuit protectionLoad lossNormal mode 7 mA, power-saving mode 3.5 mACharging circuit voltage dropNot more than 0.26VDischarge circuit voltage dropNot more than 0.15VOver-voltage protection17VOperating temperatureIndustrial: -35 to +55 (suffix I);Equalize voltage12.6VTemperature compensation-4.5mv / / 2V (boosting,equalize charge, floating charge, charge return voltage compensation)Over-discharge voltage9.0VOver-discharge voltage return10.0VControlPWM Charge Mode5 / 5
- 温馨提示:
1: 本站所有资源如无特殊说明,都需要本地电脑安装OFFICE2007和PDF阅读器。图纸软件为CAD,CAXA,PROE,UG,SolidWorks等.压缩文件请下载最新的WinRAR软件解压。
2: 本站的文档不包含任何第三方提供的附件图纸等,如果需要附件,请联系上传者。文件的所有权益归上传用户所有。
3.本站RAR压缩包中若带图纸,网页内容里面会有图纸预览,若没有图纸预览就没有图纸。
4. 未经权益所有人同意不得将文件中的内容挪作商业或盈利用途。
5. 装配图网仅提供信息存储空间,仅对用户上传内容的表现方式做保护处理,对用户上传分享的文档内容本身不做任何修改或编辑,并不能对任何下载内容负责。
6. 下载文件中如有侵权或不适当内容,请与我们联系,我们立即纠正。
7. 本站不保证下载资源的准确性、安全性和完整性, 同时也不承担用户因使用这些下载资源对自己和他人造成任何形式的伤害或损失。
